How to Repair or Replace a Broken Zipper on Your Backpack? The quickest fix is to realign or replace the zipper slider. If that doesn’t work, then swap the whole zipper. This way, your bag will close securely again. This simple repair can save your favorite backpack and protect everything inside. A jammed zipper can ruin your day. It might stick halfway, the teeth may not line up, or the pull could pop off. These issues can turn a simple outing or hiking trip into a real hassle. You might worry about losing your valuables. You could also stress over expensive repairs or needing to buy a new bag. This condition is especially true when you’re far from home or on a tight budget. Dirt, moisture, and heavy loads can wear down the zipper. This makes it more frustrating. This guide will show you how to fix common zipper problems yourself in a few straightforward steps. You’ll also discover when to replace the entire zipper and how to prevent further damage. You will learn how to keep your backpack safe without wasting time or money by the end.
Understanding the Problem
Backpack zippers work hard every time we open and close them, so it’s no surprise they wear out. A broken zipper can significantly hinder the usability of a sturdy backpack. Luckily, many problems are simple to fix. You need basic things like pliers, a needle and thread, or some lubricant for your zipper. Knowing what common zipper problems are, what causes them, and when to replace a zipper can save you time and money.
What Are the Common Zipper Problems in Backpacks?
On my own hikes and daily commutes, I’ve seen nearly every common zipper issue. Here are the main ones:
- Stuck or Jammed Slider: Dirt or fabric can get caught in the zipper teeth. This makes it difficult to close the zipper smoothly.
- Teeth that won’t stay together: The slider can lose grip on the zipper’s sides. This causes the zip to pop open, even when pulled all the way up.
- Broken slider or pull tab: The zipper pull or slider can break or bend. This makes fixing the zipper hard without replacing parts.
- Teeth damage: If the teeth on the zipper are missing or bent, the slider won’t be able to move across the end of the zipper.
- Loose stitches: If the stitch that holds the zipper on a backpack comes loose, the zipper can come off the fabric.
Backpack zippers can fail, whether on school bags or tough travel packs. So, it’s important to watch them closely.
Why Zipper Issues Happen: Causes and Wear
Zippers don’t fail overnight. The slider and zipper teeth wear out over time from constant use. Here are the main reasons:
- Daily strain: Stuffing a backpack too full stresses the zipper and slider. This can wear out the teeth.
- Dirt and moisture: Sand, grit, and dampness around the zipper grind the metal or plastic parts. Without cleaning or zipper lubricant, friction builds up.
- Cheap materials: Low-quality sliders or thin stitching can’t handle heavy loads. I once had a budget backpack where the end of the zipper tore after only a few months.
- Improper use: Forcing the zip or yanking the zipper pull quickly can bend the teeth or break the slider.
Regular cleaning and using a sewing machine or hand sewing can tighten loose stitches. This can slow down wear.
How to Determine if Repair or Full Replacement Is Needed
Before grabbing a plier or calling for zipper repair, check how serious the damage is. I follow a quick test:
- Check the slider grip. If the slider seems loose but the zipper teeth are fine, try squeezing it gently with pliers. This remedy often fixes the issue.
- Inspect the zipper teeth. If teeth are missing or the sides of the zipper won’t align, you may need a new one.
- Look at the stitching. If the zipper stitch on your backpack is coming apart, you can restitch it. Use a sewing machine or a needle and thread.
- Pull test. Try to close the zipper slowly. If the slider pops open or the zip splits behind it, it might need replacing.
If the zipper pull or slider sustains damage, you can repair it at home using basic tools. However, if the zipper tape or numerous zipper teeth are missing, a complete replacement is the more secure option. Sometimes, getting a zipper repaired by a pro is cheaper than buying a new backpack. This is especially true if the bag is difficult to replace.
Tools & Materials You’ll Need
To fix a backpack zipper or even replace a backpack zipper, you don’t need a workshop—just a few simple items. Using the right tools and parts makes any DIY zipper repair guide easier. This is true for a stuck zipper or a broken one on a backpack. Below are the basics I always keep on hand.
Basic Tools for DIY Zipper Repair
I was surprised by how much I really needed it when I first learned how to fix the zipper on my hiking pack. Here’s my list of things to do:
- Small pliers: Great for tightening or reshaping a loose zipper slider. They also help secure the zipper’s bottom.
- Needle and thread, or a sewing kit: Useful for securing a zipper or restitching a loose side.
- Seam ripper or small scissors: Use these to take out the old zipper if you need to replace it completely.
- Zipper lubricant or a bar of soap: Makes a stuck zipper glide smoothly along the zipper track.
- Measuring tape and fabric chalk: Great for marking the new zipper’s placement. This helps it line up with the part that stays attached.
These tools are great for quick fixes, like tightening a slider. They also work on bigger jobs, such as fixing a broken zipper from the bottom to the top.
Replacement Parts
Sometimes you can’t fix a broken zipper with tools alone—you need new parts. I always keep a small repair kit with me
- Replacement sliders and pulls are essential when the slider is bent or the pull tab snaps off.
- Zipper stops and end pieces: Hold the zipper in place at the top and bottom so it doesn’t separate again.
- Full zipper lengths: For major zipper issues when the existing zipper or track can’t be repaired.
Having the right parts on hand saves you from an unexpected trip to the store when you’re halfway through a repair.
How to Choose the Right Parts (Zipper Type, Slider Size)
Picking the right replacement can be tough for many, but it’s easier than it seems. I follow three quick checks before I fix the zipper or replace the backpack zipper:
- Match the type: Check if your backpack uses a coil, plastic, or metal zipper. Use the same type so the new part of the zipper blends with the fabric.
- Measure the slider: Look for a small number stamped on the existing zipper slider; that is the size you need.
- Check length and color: Ensure the new zipper matches or exceeds the old one’s length. This way, you can secure both the top and bottom without any gaps.
Matching these details helps you avoid a misaligned zipper. This way, it closes properly. I once tried to fix a stuck zipper. I used a slider that was a bit too small. It kept popping off one side. Then, I replaced it with the right size.
Step-by-Step Repair Methods
It might seem hard to fix a broken zipper on your backpack. But you can do it yourself at home if you follow the right steps. You can fix your zipper or replace it completely with just a few tools and some time. This guide shows you how to fix the most common zipper problems, step by step.
How to Fix a Stuck or Jammed Zipper Slider
One of the most common problems backpack owners have is a zipper that won’t open. This is the easiest way to fix your zipper:
- Check the zipper closely to see if any fabric is stuck in the teeth.
- Apply a lubricant to the zipper. Use soap, pencil graphite, or zipper lubricant. Then, move the zipper slider back and forth gently to help loosen the jam.
- Use the pliers to make a small change to the slider at the top or base of the zipper if necessary.
- Test by opening and closing the entire zipper a few times to make sure it glides smoothly.
In my experience, you can usually free stuck zippers without replacing them. This is true, especially if nothing is broken or separated.
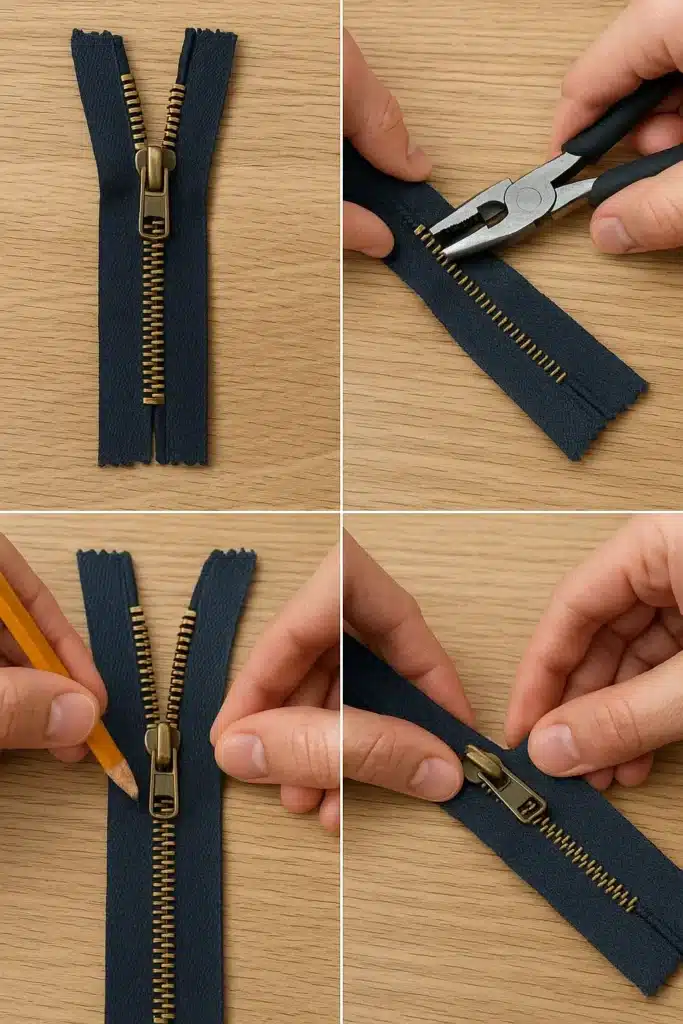
How to Realign Misaligned Teeth or Fix a Zipper That Keeps Popping Open
The zipper teeth don’t always line up right, or the slider can’t keep the zipper together:
- Check the zipper from start to finish to find any misaligned teeth.
- Move the slider gently to the base of the zipper and check if it engages all the teeth.
- Realign the zipper with your fingers or small pliers. This helps both sides fit together correctly.
- Test the zip by closing it slowly to see if it still pops open.
This method is excellent for fixing separated zippers. It saves time and money because you don’t need a new zipper.
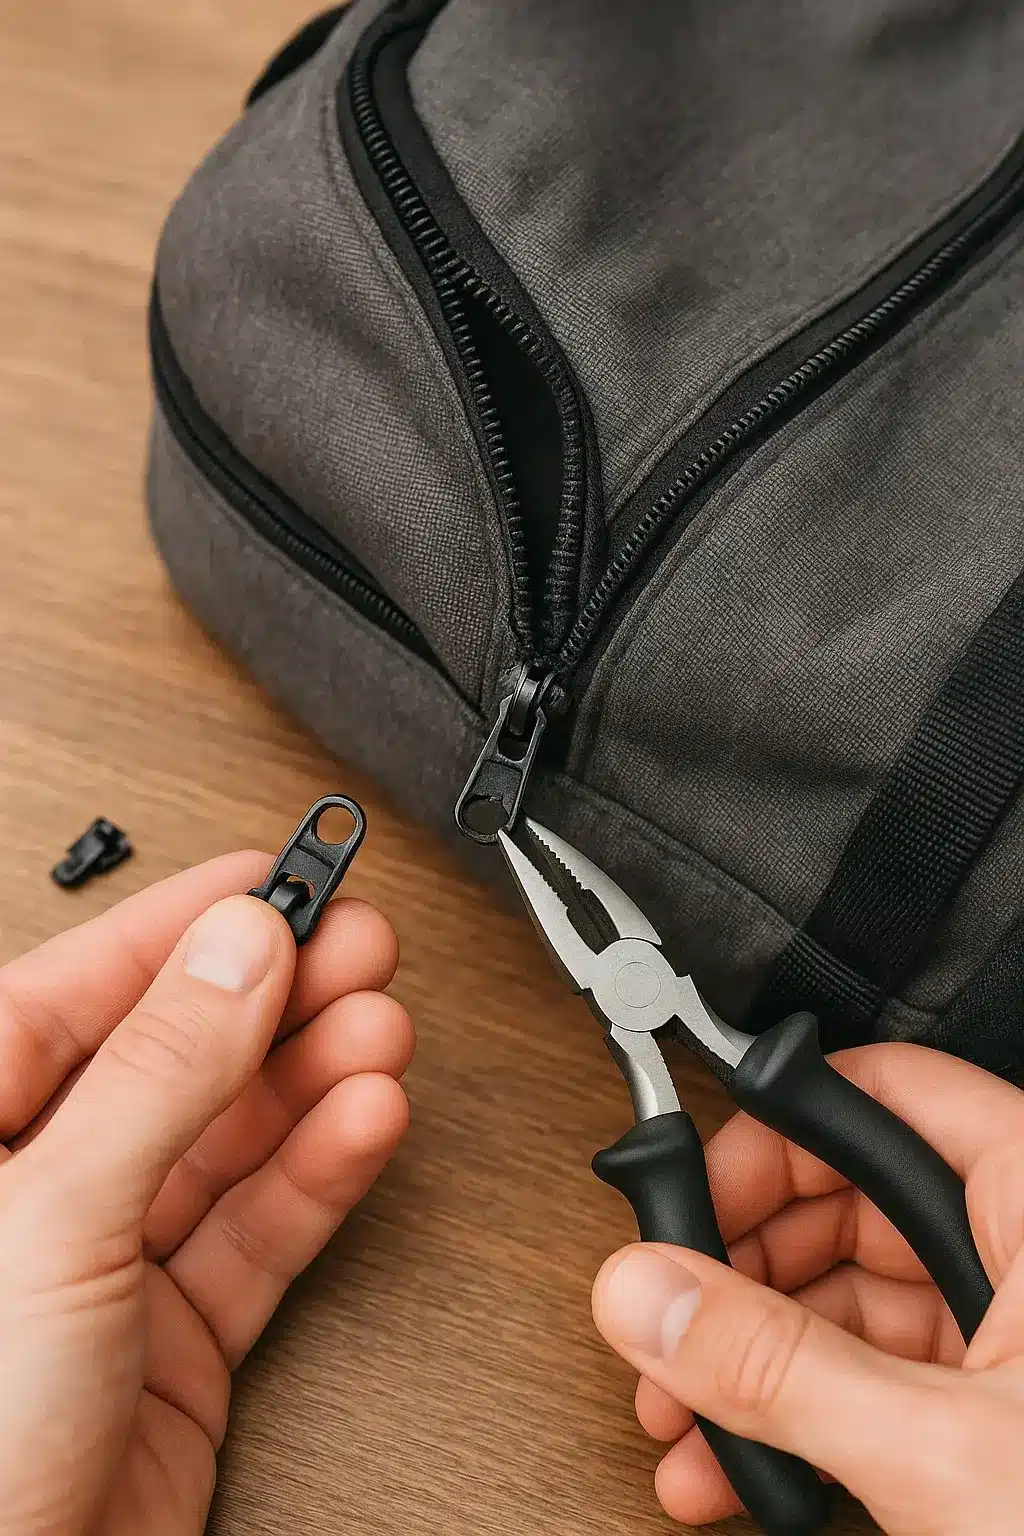
How to Replace a Broken Slider or Pull Tab
If the slider is bent or the zipper pull is broken, you’ll need a replacement part. I’ve done this several times on my hiking backpack:
- To remove the old slider, gently open the zipper stops located at either the top or bottom of the zipper.
- Get the zipper replacement slider that matches the size and type of your existing zipper.
- Carefully slide the new slider onto the zipper tape. Make sure it fits over both sides of the zipper teeth.
- Close the zipper fully and replace the top or bottom stop to hold the slider in place.
With a bit of practice, you’ll be able to fix a zipper without sewing or replacing the entire one.
How to Replace the Full Zipper (Teeth & Tape)
Damage to the zipper tape or teeth necessitates a complete zipper replacement. Here’s the step-by-step way:
- To get a new zipper that fits, measure the length of the one you already have.
- Carefully take off the old zipper with a seam ripper, being careful not to rip the fabric.
- Put the new zipper on the side of the backpack and use pins to hold it in place.
- To make sure the new zipper tape is secure, use a zipper foot on your sewing machine or a needle and thread.
- Open and close the zipper a few times to see if it works. This ensures that things move smoothly.
Replacing the whole zipper takes time and some tools. But it’s the only solution if the damage affects the zipper track or several teeth. From my experience, doing these tasks correctly keeps the backpack functional for years.
Temporary Fixes & Quick Solutions
Sometimes you need a fast way to zip your backpack when the zipper sticks or breaks. These quick ideas help you keep moving even if you don’t have a full repair kit handy. You need a few tools at most for these tricks, and you can do many with items you already carry.
No-Tool Fixes You Can Try in a Pinch
If your zipper gets stuck while hiking or going to class, try these easy steps first. Don’t stress about replacing the zipper just yet.
- Smooth it out: Rub a small amount of lubricant on the zipper teeth—lip balm or a graphite pencil works well. Slide the zipper pull tab back and forth along the zipper teeth to free it.
- Re-seat the slider: If the zipper came apart at the base, pull the zipper pull gently from any fabric snag. Then, wiggle the slider back onto the zipper. I’ve done this procedure on my backpack while traveling, and it kept my bag secure all day.
- Secure with a safety pin or clip: If the zipper is broken and won’t close, line up both sides. Clip them together. This way, you can open and close the zipper only when needed.
These quick fixes help you open and close the zipper. You won’t need to replace it right now. This gives you time to plan a better repair later.
Local Repair vs Professional Help
If the zipper needs more than quick fixes—like a slider that has come off or torn fabric—you’ll need a lasting solution. You have two main choices:
- Local repair shop: Many tailors or shoe-repair shops can replace a zipper or adjust its length for a small fee. They usually have needle-nose pliers, heavy-duty thread, and the right skills to get the job done in a day.
- Professional outdoor gear service: For a high-quality bag, a specialty service can swap out the zipper for one that fits perfectly. It costs more, but it’s worth it if you want the backpack back in top shape.
In my experience, a local shop is usually the quickest way to fix a zipper. This is true when the slider has come off or when the zipper won’t move, even with lubricant on the track.
Material-Specific Zipper Tips
Not all zippers behave the same way, and the backpack material around them matters too. Learn how a zipper works with different fabrics before buying one or visiting a repair shop. Furthermore, know the care it needs. This step helps you avoid a broken zipper pull or a slider that wears out too soon.
Caring for Metal, Plastic, and Coil Zippers
I’ve noticed that each type of zipper may require a unique approach.
- Metal zippers: Strong but can rust or snag. Wipe them dry after rain and use simple tools to repair the bent teeth with care. If the zipper is still stiff, you may need to replace the slider or even remove and reset it.
- Plastic zippers: They are smooth and light, but if you pull too hard, the teeth may break. To prevent it from coming off, if you must replace the slider here, make sure it is the same size as the original zipper.
- Coil zippers: Flexible and common on soft backpacks. They resist dirt but can stretch over time. If the coil starts to separate, a quick trip to a repair shop can help repair the teeth before they get worse.
I always check the backpack material near the zipper. Thick fabric can hide small snags. These snags can prevent the zip from moving smoothly.
Best Lubricants for Each Zipper Material
The right lubricant can make a big difference:
- Metal zippers: Use a dry graphite stick or candle wax. They help zippers slide smoothly and won’t leave stains.
- Plastic zippers: A silicone-based spray works best because it won’t crack the teeth.
- Coil zippers: A light sewing machine oil or a dab of clear lip balm is enough to keep them smooth.
If a broken zipper pull makes it difficult to apply lubricant evenly, I use a cotton swab to reach between the teeth. Future jams can be avoided, in my experience, by adding a little along the track and sliding it back and forth. By doing this, you may avoid the need to replace the slider entirely.
Protecting the Backpack Fabric During Repairs
Keeping the fabric intact can be the hardest part of fixing a cherished backpack. A minor error could weaken the seams or destroy the waterproof coating. I’ve found that fixing a zipper fast isn’t as important as taking my time and using the right tools.
How to Remove a Zipper Without Damaging Waterproof Layers?
If you want to replace a worn or jammed zipper, the first step is to protect the waterproof surface. I once had a hiking pack. Its coating peeled after a tough repair. Now, I always check how I attach the zipper before I start.
Here’s the simple method I use:
- Lay the backpack flat and unzip it as much as possible.
- Use a seam ripper or craft knife to cut the thread carefully. Keep a bit of thread on each side of the fabric. This will help you avoid scratches.
- Go slow near corners where zippers are typically reinforced.
Tip from experience: Place a thin cardboard sheet under the seam as you work. It acts like a guard, so the blade never touches the waterproof layer. If you spot fraying, dab a little clear fabric sealant right away to keep the edge tight.
Reinforcing Stitch Lines to Keep the Bag Durable and Water-Resistant
After removing or fixing the zipper, the next goal is to make the seam strong again. I once thought simple hand sewing was enough, but after a rainy trek, I realized water sneaks in if the seam isn’t sealed.
- Start by checking every hole left behind. These gaps invite leaks.
- Use sturdy nylon thread to sew, keeping the stitch length equal.
- To keep water out of the new stitches, cover them with a thin strip of seam tape or liquid sealant.
If the slider still feels loose, use pliers to tighten it until it is secure before closing the seam. This small step helps the repair last longer than another common zipper swap. It’s a quick trick that keeps a functioning zipper smooth even after many trips.
Take your time and respect the material. This way, you can fix your backpack and keep it ready for adventures for years.
Cost and Time Breakdown
Fixing a favorite backpack can cost less than buying a new one. But it really depends on how big the issue is and how much time you have to spend. A broken zipper on a backpack is a common problem. You can fix it cheaply by following a simple DIY guide. But if you go to a shop, it might take days.
DIY vs. Professional Repair—Average Costs & Turnaround Time
I often fix my packs because I like control over the results. A simple zipper repair at home typically costs just the price of a replacement zipper, which is about $5 to $10. You might also need a small tube of seam sealant, if necessary. The biggest investment is time. You can complete the job in one to two hours with a simple step-by-step guide, even if one side of the zipper is frayed.
Here’s a quick cost and time snapshot:
| Repair Type | Average Cost | Typical Time | Notes |
|---|---|---|---|
| DIY basic zipper fix | $5–$15 | 1–2 hours | Check the length of the existing zipper before buying. |
| Professional shop | $25–$60 | 3–7 days | Good for repairs where the zipper is stuck or torn fabric needs reinforcement. |
DIY tips from my repairs:
- To ensure the new piece lines up, carefully measure the length of the zipper and mark a bit on each side.
- To extract broken teeth or remove the zipper slider, use needle-nose pliers. This keeps the fabric from getting ruined.
- If the zipper remains stuck, gently add a drop of lubricant to the zipper teeth and slide back and forth.
- Sew the new zipper in slowly. Keep the stitches straight around the zipper track.
Occasionally, I need to unzip and take off the slider. Then, I slip the zipper pull back into position along the fabric edge. Always explore how a zipper is attached before cutting, and choose a quality zipper for the best life.
When the Price of Repair Isn’t Worth It Compared to a New Backpack
There are times when even the most patient repair isn’t smart. If the fabric is torn in many places or the zipper continues to break, you may end up wasting money on quick fixes. A shop can charge over half the cost of a new pack if they need to replace several seams or buy special hardware.
For example, when I see a zipper that costs nearly as much as an entry-level daypack, I rethink the repair. When the main frame is bent or the coating is peeling everywhere, no amount of needle-nose pliers will help. That’s when I say goodbye and search for a new trail buddy. I refuse to impose a new zipper on a bag that has seen better days.
Consider the sentimental value of your backpack. Then, weigh it against the total cost and time involved. If you would rather spend a weekend hiking than sewing, sometimes a fresh start with a new pack is the better deal.
Preventing Future Zipper Damage
This part shows you how to prevent backpack zippers from wearing out. This way, you won’t deal with zippers that separate or get stuck again. It focuses on three main areas: regular maintenance, smart daily habits, and selecting quality gear. Regular care means brushing off dirt, adding lubricant, and zipping the slider. This approach helps keep it tight and working well.
Smart habits are:
- Pack lightly.
- Pull the slider straight.
- Never force it if it comes off the zipper.
When buying a bag or replacing parts, choose strong materials. This way, a repair shop can install a lasting zipper. By treating a beloved backpack this way, anyone can follow an easy DIY guide to keep the zipper smooth for years.
Conclusion
Fixing a backpack zipper is easier than many people think. You can now identify common issues, acquire the necessary tools, and follow straightforward steps to repair or replace a slider, pull tab, or the entire zipper. Take care of your zipper. Clean the teeth, use a light lubricant, and close the bag gently. This way, your zipper stays strong for years. Before buying a new backpack, try these methods first. A few minutes of careful work can save money, protect your beloved backpack, and keep it ready for every trip. Repairing before replacing is not only smart but also kinder to the environment.
Frequently Asked Questions
How do I fix a broken backpack zipper?
Use pliers to tighten the slider and add a bit of zipper lubricant; replace the slider if it still won’t close.
How to replace a broken zipper?
Take out the old zipper with a seam ripper. Then, sew in a matching replacement zipper using a sewing machine or a strong needle and thread.
Can I fix a zipper without any tools?
Yes, you can attempt fast fixes like adjusting the slider or lubricating it with a small amount of soap or candle wax.
How do I know what slider size or type I need?
Check the number of letters stamped on the back of the old slider and match it to the same size and style.
How much time does a replacement take?
A simple slider swap takes about 15–20 minutes, while replacing the full zipper usually takes around an hour.
Is replacing a zipper costly or worth it vs buying a new backpack?
A new zipper and thread usually cost a few dollars, which is far cheaper than buying a whole new bag
1 thought on “How to Repair or Replace a Broken Zipper on Your Backpack?”