How to make a backpack strap? You can make strong, comfy straps at home with minimal effort. Use the right materials and sewing techniques. Many people have trouble with backpack straps. They can dig into shoulders, wear out fast, or not fit right. Buying a new backpack can be costly, and repairs don’t always last. That’s why learning how to make a backpack strap is such a useful skill. In this guide, you’ll learn to fix common problems. These include weak stitching, poor padding, and straps that don’t share weight evenly. We’ll cover the best fabrics, easy sewing tips, and how to make straps that are both durable and comfy for you. By the end, you’ll know how to make straps that fix discomfort, poor quality, and wasted money.
1. How to make a backpack strap quickly
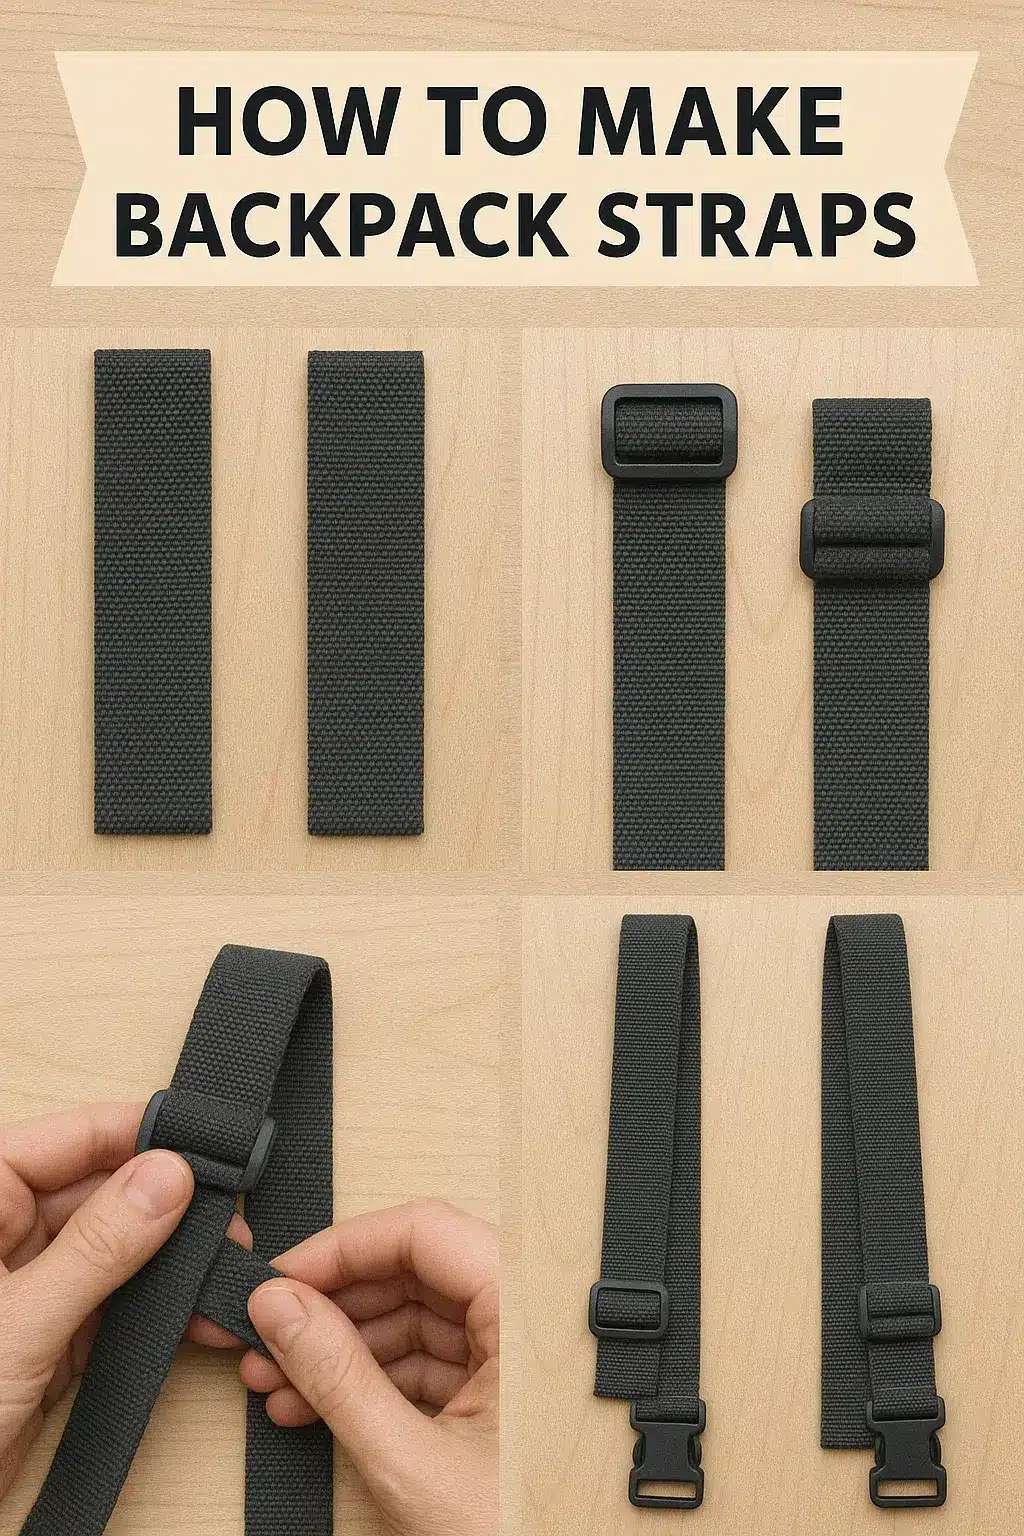
How to make a backpack strap? To do this: Cut a strong fabric or webbing. Fold it, placing padding inside. Sew the edges with durable thread. Attach it to the backpack with a ground or cut. It gives you a durable strap that is comfortable and does not dig into the shoulders.
What you need: materials, tools, and basics.
From my own sewing projects, I’ve learned that a good strap starts with the right materials. Weak fabric or bad stitching can cause the strap to break quickly. So, always pick strong items. Here’s a simple list:
- Fabric: nylon or polyester for strength.
- Webbing: strong 1–2-inch-wide strap webbing for load support.
- Padding: foam for comfort (optional, but it helps with heavy backpacks)
- Thread: heavy-duty polyester thread so seams don’t pull apart.
- Needles and sewing machines: make sewing faster and cleaner.
- Buckle or clip: to adjust or lock the strap’s length.
- Scissors and pins: for cutting and holding layers together.
To give you a clearer idea, here’s a quick comparison table between a DIY strap and a ready-made strap:
| Feature | DIY Strap | Store-Bought Strap |
|---|---|---|
| Cost | Low (just fabric, webbing, thread) | Medium to High |
| Comfort | Custom padding, fold thickness as needed | Standard padding |
| Durability | Depends on stitch and seam strength | Factory-tested |
| Customization | Fully personal (buckle, clip, length, fabric) | Limited options |
When I first tried to make the backpack strap, I got nervous about sewing thick nylon layers. Using a sewing machine with heavy thread worked well. When I turned the fabric right side out, the seam stayed strong. Adding webbing made the strap stronger. The buckle allows for easy changes. With practice, anyone can sew a strap that feels professional.
2. Why Making Your Own Backpack Straps Matters
Creating your own backpack strap is valuable. It offers comfort, strength, and design control. You won’t face chafing from weak or uncomfortable straps. You can sew one that fits your needs perfectly.
The first time I made a backpack strap, I saw how important good materials and bags were. With the help of webbing, strong fabric, and a good thread, I made a strap that lasted more than one use.
Custom Fit and Comfort
The main reason people make their own strap is comfort. Store straps are often too thin, lack padding, or don’t fit your body shape. A handmade strap lets you:
- Adjust the width to spread the weight evenly.
- Add extra folded layers of fabric for added strength.
- Sew in a soft pad for shoulder support.
For example, I once replaced a narrow strap on my backpack with wider nylon webbing. Sewing the seam with strong thread made a big difference. Locking the stitch helped, too. Now, the new strap feels much easier on my shoulders.
Cost Savings and Upcycling
Making your own backpack strap also saves money. You don’t need to buy costly replacements. You can sew one with leftover fabric, webbing, or straps from an old bag.
Here are some ideas that are easy on the budget:
- Reuse nylon webbing from an old duffel.
- Attach a new buckle to an old strap for adjustability.
- Upcycle a worn-out strap by trimming the ends and sewing them with fresh thread.
One time, I even took the strap off a purse, stitched on a buckle, and clipped it to my backpack. It worked perfectly as a replacement.
Better durability and personalization
DIY straps last longer because you control how they are made. Factory straps often break at the seam or buckle. But when you sew your own, you can reinforce these weak spots.
Ways to make a strap more durable:
- Double-stitch at every seam and lock the ends.
- Fold the webbing over the buckle and stitch it tightly.
- Use a sewing machine with heavy-duty thread for a stronger attachment.
You also get personalization. Want extra tabs, a bright color, or a unique buckle? By making your own strap, you design it in your own way. I sew the reflective fabric on my strap for better visibility at night. It was a little touch, but it made my backpack safer and more individual.
3. DIY Backpack Strap Mistakes
Common problems with backpack shoulder straps include discomfort, weak stitching, and confusion over hardware or padding. Many tutorials skip these details, leaving beginners frustrated. In this part, I’ll show you how to fix these pain points step by step, just like a real DIY project.
Discomfort: Straps Digging into Shoulders
The first issue most people face is straps that dig into their shoulders. If the width is too narrow or there’s no padding, it can hurt after a short walk.
To avoid this:
- Always fold the strap fabric around a pad for cushioning.
- Keep the width between 2–3 inches for balance.
- Add a tab at the end of the strap for extra grip.
I once made narrow straps for a bag or purse, and while they looked stylish, they became painful on long walks. After I trimmed the edges and inserted soft foam, I solved the problem.
Weak materials or poor stitching
Another mistake is using thin fabric or weak thread. This often causes the end of the strap to tear, especially around the buckle or attachment points.
Tips for durability:
- Use nylon webbing instead of cotton for strength.
- Double-stitch and lock the seams where hardware, like buckles, attaches.
- Fold the strap ends before sewing—this stops fraying.
My DIY with cotton fabric failed quickly. In contrast, my nylon and strong thread design has lasted for months.
Difficulty with foam insertion or sewing thick layers.
Many tutorials don’t explain how tricky it is to insert foam or sew through several layers. The sewing machine can jam, or the stitches look uneven.
What helps:
- Trim foam edges before sliding them in.
- Hand-baste the layers first, then sew them for cleaner seams.
- Use an adjustable needle setting if your machine allows.
If sewing feels too hard, an optional way is to hand-stitch with thick thread. It’s slower, but you get neat control over the layers.
Missing guidance on strap styles (J-strap vs. S-strap, etc.)
Most blogs don’t show you how to make different strap shapes. A J-strap is simple and straight, while an S-strap curves naturally around your body.
Comparison Table:
| Strap Style | Best For | Comfort Level | Notes |
|---|---|---|---|
| J-Strap | Simple bags, DIY beginners | Medium | Easier to sew |
| S-Strap | Hiking, heavy loads | High | Needs careful cutting and padding |
I like S-straps for hiking because they hold well. J-straps work well for quick MYOG projects.
Limited detail on proper materials and padding order.
Getting the right order of layers is often skipped in tutorials. A strong strap usually follows this order:
- Outer fabric
- Foam pad
- Webbing layer
- Lining fabric
If you fold the strap wrong or skip a layer, it loses shape. When I first tried making one, I placed the foam outside instead of inside, and it looked bulky. After checking a PDF guide from a MYOG community, I learned the correct order and got a neat finish.
Lack of Advice for Attachment Options
Most tutorials don’t cover how to attach straps to different bags. Some require loops, while others must be sewn directly into the seams.
Attachment options:
- Sew directly into the backpack’s seam.
- Add a buckle with hardware for an adjustable fit.
- Use tabs for clip-on straps (great for a bag or purse).
I find buckle attachments the best because they allow you to easily adjust the strap length.
Almost no mention of sternum straps, sliders, or built-in pockets.
A big gap is the lack of information on extras like sternum straps, sliders, or mini pockets. These small details can change your comfort level.
Examples:
- A sternum strap keeps shoulder straps in place while walking.
- Sliders let you adjust the strap length smoothly.
- Built-in pockets are optional but handy for keys or cards.
4. Planning Your Strap: Styles & Function
When planning backpack straps, start by picking a style that suits your comfort and needs. The width of the strap, throne, and small parts, like disposable and swollen clips, impacts shelf life and support. A small plan now protects you from straps attached to the bag, thrown on the ground, upset, or failing.
Choosing between J-Strap, S-Strap, Vest, or Hybrid Backpack Straps
J-straps are straight and easy, making them perfect for beginners. S-straps, but curve around your body, offering better comfort. Vest straps distribute weight evenly across your chest, like clothing. Hybrid designs combine two or more features.
Here’s a quick comparison:
| Strap Style | Comfort | Best Use | Notes |
|---|---|---|---|
| J-Strap | Medium | Everyday backpacks | Easy to sew with rectangle sewing patterns |
| S-Strap | High | Hiking or heavy loads | Needs foam and a careful seam allowance |
| Vest | Very High | Long treks or load lifters | Feels like wearing clothing |
| Hybrid | Custom | Experiment with design | Mix of styles, needs reinforcement |
I once tried a hybrid strap. It had foam padding like an S-strap but was stitched around the chest like a vest. It felt strange at first. But the reinforcement I added at stress points made it strong and supportive.
Matching Strap Style to Your Body Type and Pack Purpose
The style you choose should match your body type and how you use the backpack. If you have narrow shoulders, S-straps or vest styles help keep the straps from slipping. For larger frames, J-straps with extra foam and load lifters work well.
Things to keep in mind:
- Always add enough seam allowance so that the end of the lease is not unheard of.
- The reinforcement weeks around D-rings or hardware attach the strap to the bag.
- If you put foam inside, use enough needles for thick woven clothes.
- Stitch around stress points, like swivel clips or tabs, to prevent fraying.
Once, I made straps for a bag with D-rings at the base. I used wide webbing with foam inside. I stitched around the rectangle twice for extra strength. Even after months of daily use, nothing came loose.
5. Materials & Components for Strong, Comfortable DIY Straps
To make a strong and comfortable strap, you’ll need the right fabric, foam, webbing, and hardware. Choosing durable materials and matching the width of each piece is key. I’ll show you step by step how I built straps for backpacks and a cross-body bag. This way, you can see how it works in real life.
Face Fabrics, Backing Cloth, and Cushioning Foam
The fabric you pick goes on the strap. It needs to be strong for wear but also soft for comfort. I often pick nylon webbing with foam padding. Many others like canvas or polyester instead.
Tips I learned from experience:
- Always cut clothes with sharp scissors so that the edges do not touch the ground.
- Use backpacking straps; they reduce shoulder pressure.
- Sew layers together with nylon thread for extra strength.
Once, I experimented with thin cotton fabric for straps, but it unraveled quickly. Switching to nylon webbing with foam made the strap tougher. It also felt much better during long hikes.
Webbing, ribbon, grosgrain binding, adjusters, D-rings, and buckles.
Webbing is the backbone of most straps. If you want to make adjustable straps, you’ll also need hardware, such as buckles and D-rings. Ribbon or grosgrain binding can give a neat finish around the edges.
Here’s a quick comparison of strap components:
| Component | Purpose | Notes |
|---|---|---|
| Nylon webbing | Strength | Always match the width to your buckle size |
| Ribbon/Binding | Finish | Stops edges from fraying |
| D-rings / Buckles | Adjustability | Good for backpacks and cross-body bag straps |
| Adjusters | Tighten or loosen | Keeps straps secure under load |
I once ordered D-rings from a local supplier and attached them to the strap with nylon thread. It worked so well that I started adding them to all my DIY projects for easier adjustments.
Quick Guide on Load Lifters and Sternum Strap Hardware for Heavier Loads
If your strap is for a heavy pack, don’t skip extras like load lifters or sternum straps. These parts spread the weight over your body. This helps you carry it with greater ease on backpacking trips.
Things to remember:
- Always stitch load lifters onto the strap ends for the best angle.
- Use swivel clips if you want removable sternum straps.
- A PDF download of sewing patterns can help beginners follow the correct placement.
In my own projects, I once added load lifters but didn’t tighten them well. This made everything feel loose. After re-stitching and reviewing a tutorial, the straps felt snug and stable.
6. Construction Methods—How to Make the Strap
The easiest way to make backpack straps is to use simple sewing methods. These methods provide strength, comfort, and durability. Two common methods are the inside-out approach with foam and the baste-and-bind method. Both techniques help you shape the strap to fit your design’s width. They keep the edges neat and make it last longer.
Method 1: Inside-out construction with foam insertion
This method is great for beginners. It gives your backpack strap a padded, professional look.
Step-by-step guide:
- Cut the pieces of the two fabrics, measuring each to be longer and wider than the intended straps.
- Hold the right sides together and sew along the edges; leave a small end open.
- Using scissors or loops, exhale the strap.
- Slide the foam padding into the fabric pipe and make sure it is flat.
- Topstitch with edges to keep the foam from changing.
Personal tip: Try closed-cell foam instead of a regular sponge. It makes the strap firm but still comfy for long backpacking trips. It also avoids the strap collapsing over time.
Method 2: Baste and bind the construction for clean edges.
If you prefer visible padding and stronger edges, this method works best.
How it works:
- Lay the foam padding on the fabric without any intervening layers.
- Use a nylon thread to baste (a temporary stitch) the foam in place.
- Bind the raw edges using bias tape or nylon webbing that matches the width of the strap.
- Stitch it down with strong tension to ensure durability.
- Suppliers of tactical bags and cross-body bag straps favor this method. It provides a clean finish and supports heavy loads with great efficiency.
Tips for adding padding with precision and simplicity.
- Match the width of the foam and fabric before sewing so it doesn’t bunch up.
- Always use nylon thread for durability—it tightens well and doesn’t snap under weight.
- Adjust the padding thickness depending on your style. Use Depax for heavy backpacks and slim straps for wider individuals.
- If you are unsure which method suits you best, try both the scrap fabric and compare the comforts.
- You can save a step-by-step PDF of your process. Use it for future reference or share it with others.
Based on my experience, the baste-and-bind method offers better control for different strap styles. But the inside-out method is quicker for sewing a casual bag at home.
7. Attaching the Straps to the Backpack – Options & How-To
How you attach straps to a backpack affects its strength, comfort, and durability. You can sew them in easily. You can also add patches. Another option is to use removable items like D-rings and buckles. Reinforcing the attachment is important. This area gets the most stress during daily use or backpacking trips.
Sewn-in vs. sewn-on with a patch
The seam method is the simplest: you attach the strap directly to the backpack. It gives a clean shape and feels stable, but if the strap ever tears, it’s hard to repair.
The sewn-on-with-patch method uses an extra fabric patch as a base. Some place the strap over the patch and sew it down, usually outside the bag. This spreads the pressure and prevents heavy loads from damaging the fabric.
Quick comparison:
| Method | Pros | Cons | Best for |
|---|---|---|---|
| Sewn-in | Clean finish, looks professional | Harder to repair | Everyday backpacks |
| Sewn-on with a patch | Stronger, spreads tension evenly | Slightly bulkier look | Hiking, travel bags |
I like the patch method for sewing with nylon webbing. It matches the strap’s width and adds durability without much extra weight.
Removable attachments: D-rings, daisy chains, and buckles.
Sometimes you want to adjust or swap out straps. That’s where removable options come in:
- D-rings allow you to attach and detach straps with minimal effort.
- Daisy chains: Rows of loops sewn onto the bag through which straps or cords can pass. They’re great for different styles of carrying gear.
- Buckles: They let you tighten or loosen quickly. You often see them in crossbody bags and heavy backpacks.
These options make the backpack more versatile. I used buckles on my backpacking pack. This lets me change between padded straps and lightweight webbing for various trips.
Where and how to reinforce: bar tacks, box-X stitches, and backstitching
No matter how you attach the straps, reinforcement is what makes them last. Weak stitching here is the number one reason that straps fail.
- Bar tacks: Short, dense stitches across the strap end, perfect for high-stress spots.
- Box-X stitch: A square with an “X” inside—often seen in store-bought backpacks. This spreads the load in every direction.
- Backstitching: Going back over key areas to tighten the seam and prevent unraveling.
I always use a Box-X stitch with nylon thread when attaching straps in a heavy-duty package. It takes a little longer, but it holds even when you load the bag with books, hiking equipment, or laptops.
8. Extras: Comfort and Custom Features
You can make backpack straps more comfortable and useful by adding features like:
- Sternum straps
- Slide-on systems
- Built-in pockets
A sternum strap links the shoulder straps across the chest. It helps reduce strain and keeps the straps secure. You can have it stitched in for stability or adjustable with a clip for flexibility. I prefer the adjustable option for hiking and long walks. Slide-on sternum straps can be removed and adjusted along the webbing. This makes them optional for users who do not always need them. Many people add stretch pockets to hold small items like wires, sunglasses, or snacks. Built-in strap pockets are good for important things like phones or keys. These items can be difficult to lose, so it is useful to work with them. To add a pocket, match the width of the strap. Sew with accuracy and strengthen the seam. It helps to prevent fright or unwillingness. These upgrades look small, but they promote comfort and practicality. They are useful for carrying daily use, backpacking trips, or transverse bags. Wondering if sternum straps are necessary? They’re not required, but their recommendation is strong. They help if your backpack feels heavy or slips off your shoulders. Can I add pockets to existing straps? Yes, you can. You can sew on stretch pockets or clip on small ones. Ensure that you match the width and secure them with a strong thread. Do slide-on sternum straps work well? They offer flexibility. You can move or remove them with little effort. But they might shift more than stitched ones.
9. Step-by-Step Tutorial Outline
Making a backpack strap may seem hard, but it’s easy when you take small steps. Take precise measurements. Use the right fabric and webbing. Sew with strong thread. This way, the strap can hold weight without coming apart. I’ve made my own straps before, and once you understand the basics, it’s about carefully following each step.
Measure and cut the materials
Start by measuring the length and width of the strap you want. The strap width usually measures between 1.5 and 2 inches. You can adjust it based on your backpack size. Cut your fabric, webbing, and foam insert to match these measurements. Always add a little extra for seam allowance so you don’t end up with a strap that is too short.
Layer and sew the strap
Place the fabric pieces together with the right sides facing in, then put the foam on top. Sew along the edges, leaving one end open. A sewing machine makes this part faster, but you can also sew by hand with a strong needle and durable nylon thread. Remember to lock the stitches at the start and end so they don’t unravel later.
Insert foam and bind
Turn the fabric right-side out and slide the foam inside. This adds a soft pad to the shoulder straps. It makes carrying heavy loads more comfortable. To make it neat, fold the raw edges inward and stitch around the strap to bind everything in place. I like to double-stitch around high-stress points because it adds reinforcement.
Attach webbing or adjusters
Cut the nylon limb to the needed length. For an adjustable leash, push the buckle through a hardware piece. Sew the strap’s end with strong stitches to prevent Bodhi from slipping. If you make a DIY strap for a bag, add a clip, an AV ring, or a tank clip for attachment.
Reinforce and finish
To avoid fraying, stitch around the edges one more time. Add a box or rectangle stitch at the strap’s end. This boosts strength, especially where the lifters bear the most weight. I always test sewing patterns here. Reinforcement helps straps last longer.
Attach to backpack
Line the end of the strap with the backpack seam. Sew it with strong stitches like a box x or zig-zag. This protects the lease and prevents damage, even during heavy use or rebellion. If you take a start, take your time. It is important to attach straps for durability.
Conclusion
Creating your own backpack straps is easier than it seems when you follow a clear process. Choose the right fabric and materials. Take precise measurements. Learn the proper construction methods. This way, you can create straps that are strong, durable, and comfortable. To make your backpack more practical and personalized, focus on attachments. Use reinforcement techniques and add extras like sternum straps, pockets, or slide-on systems. To make a strap for daily use, a cross-body bag, or a backpacking trip, follow these steps. They will help your straps last longer and support weight with ease. With some patience and a bit of trial and error, you can create stylish and functional backpack straps that suit your needs.
Frequently Asked Questions
What material to use for backpack straps?
The best materials for backpack straps are durable fabrics like nylon, polyester, or canvas combined with foam padding for comfort and strength.
Can I make adjustable backpack straps at home?
Yes, you can! Use nylon webbing, buckles, or clips to create adjustable straps. Slide the webbing through the hardware. Sew the ends with firm pressure. This way, you can adjust the strap length with ease, preventing it from slipping.
How to reinforce the backpack strap attachment so it doesn’t tear?
Reinforce backpack straps using box-X, bar-tack, or double stitches. Also, fold the edges to stop fraying.
Which fabric do they use for backpack straps?
Backpack strips are often made from strong materials like nylon, polyester, or grosgrain. They usually have padding, like closed-cell foam, for added comfort.
How do you sew a backpack strap by hand?
To sew a backpack strap by hand, use strong thread and a needle. This way, you can create a sturdy seam with many stitches at key points for strength. Sew through the fabric with strong stitches.
What is the strongest fabric for backpacks?
The best fabrics for backpacks are nylon and Cordura. They are strong, water-resistant, and can handle heavy use. Plus, they resist wear well.