Carrying a heavy backpack can make any backpacking trip tiring and uncomfortable. It can strain your back, shoulders, and hips, making even short walks feel exhausting. Learning how to make your backpack lighter isn’t just about carrying less. It helps protect your posture, saves energy, and makes hikes safer. A lighter pack enables you to move faster, reduces fatigue, and lets you enjoy the scenery. You can focus on beauty instead of pain. Packing with care is important, whether you’re new to hiking or an expert. Knowing what to bring and what to skip can completely change your experience. From optimizing gear to planning meals and clothing layers, every small change counts. By the end of this guide, you’ll discover expert tips to lighten your backpack. You’ll carry only the essentials and stay comfortable on your adventures.
Why does a lighter backpack matter?
When it comes to backpacking, the weight you carry can make or break your experience. A heavy pack doesn’t slow you down—it can affect your health, posture, and enjoyment. Finding ways to lighten your pack helps you move better. It reduces fatigue and keeps your body safe during short hikes or long trips. Using ultralight gear or a standard setup is okay. But understanding why a lighter backpack matters is important. It can enhance your backpacking experience.
The Health Benefits of Lightening Your Load
Carrying less weight in your backpack has direct benefits for your body. Here’s how a lighter pack helps:
- Stops back pain and posture issues: A heavy backpack can pull your shoulders and spine out of alignment. Over time, this can lead to chronic pain or strain. By reducing backpack weight, you give your spine a break and maintain a natural posture.
- Lighter backpacks cut fatigue on long hikes. Each extra pound uses more energy. A lighter pack means you can hike farther without getting as tired.
- Boosts comfort: A lighter pack lets you enjoy the trail and scenery without worrying about discomfort or pain.
Experts say your pack should usually stay between 20% and 25% of your body weight for day hikes. Ultralight backpacking gear can significantly reduce the weight for multi-day trips. It helps reduce strain and makes carrying essentials simpler.
The Science Behind Backpack Weight and Energy Levels
The impact of backpack weight on your energy levels is supported by research. Studies show that for every extra kilogram carried, your body uses up to 2% more energy. This can make climbs, uneven trails, or long distances feel much harder. Reducing pack weight by just a few pounds can boost endurance.
Recommended weight limits:
- Children and teenagers: Keep packs under 10–15% of body weight.
- Adults (short hikes): 15–20% of body weight
- Adults (multi-day backpacking): 20–25% with ultralight gear.
Reducing your backpack weight doesn’t mean leaving essentials behind. Instead, it’s about making smart choices, using multi-purpose items, and selecting lightweight alternatives for your sleep system, sleeping bag, sleeping pad, and other backpacking gear. Even small adjustments, like choosing a compact water bottle or layering clothing efficiently, contribute to significant weight savings.
Knowing how a lighter pack boosts your health and energy helps you carry less. This way, you can hike longer and enjoy every backpacking trip without extra strain.
Why does a lighter backpack matter?
When it comes to backpacking, the weight you carry can make or break your experience. A heavy pack doesn’t slow you down—it can affect your health, posture, and enjoyment. Finding ways to lighten your pack helps you move better. It reduces fatigue and keeps your body safe during short hikes or long trips. Using ultralight gear or a standard setup is okay. But understanding why a lighter backpack matters is important. It can enhance your backpacking experience.
The Health Benefits of Lightening Your Load
Carrying less weight in your backpack has direct benefits for your body. Here’s how a lighter pack helps:
- Stops back pain and posture issues: A heavy backpack can misalign your shoulders and spine. Over time, this can lead to chronic pain or strain. By reducing backpack weight, you give your spine a break and maintain a natural posture.
- Lighter backpacks cut fatigue on long hikes. Each extra pound uses more energy. A lighter pack means you can hike farther without getting as tired.
- Boosts Comfort: A lighter pack helps you enjoy the trail and scenery. You won’t have to worry about discomfort or pain.
Experts say your pack should usually stay between 20% and 25% of your body weight for day hikes. Ultralight backpacking gear can significantly reduce the weight for multi-day trips. It helps reduce strain and makes carrying essentials simpler.
The Science Behind Backpack Weight and Energy Levels
Research supports the impact of backpack weight on your energy levels. Studies show that for every extra kilogram carried, your body uses up to 2% more energy. This can make climbs, uneven trails, or long distances feel much harder. Reducing pack weight by just a few pounds can boost endurance.
| Backpack Weight (kg) | Energy Increase (%) | Impact on Hike |
|---|---|---|
| 5 kg | 1–2% | Easy day hike |
| 10 kg | 2–4% | Moderate hike, noticeable fatigue |
| 15 kg+ | 4–6% | Long or steep hikes, high fatigue risk |
Recommended weight limits:
- Children and teenagers: Keep packs under 10–15% of body weight.
- Adults (short hikes): 15–20% of body weight
- Adults (multi-day backpacking): 20–25% withultralight gear.
Reducing your backpack weight doesn’t mean leaving essentials behind. It’s about making smart choices. Pick lightweight, multi-use items for your sleep system, sleeping bag, pad, and gear. Small changes, like picking a compact water bottle or layering clothes well, can save a lot of weight. Knowing how a lighter pack boosts your health and energy helps you carry less. This way, you can hike longer and enjoy every backpacking trip without extra strain.
Beginner-Friendly Guide to Lightening Your Backpack
For beginner backpackers, knowing how to lighten your backpacking load can feel overwhelming. Packing light isn’t about ditching essentials. It’s all about smart choices. Avoid extra gear and balance your weight well. These steps help you save energy, prevent strain, and enhance your comfort during the trek.
Step 1: Evaluate what you really need
The first step to lighten your backpack is to select the items that are essential. Many beginners make the mistake of packing everything “just in case.” This leads to less weight in theory, but in reality, it increases fatigue and slows you down.
Ask yourself:
- Will I use this item every day of the trek?
- Can one item serve many purposes?
- Is there a lighter alternative available?
Common beginner mistakes include overpacking clothing, multiple pairs of shoes, and too many gadgets. Pick a few versatile items. A fleece keeps you warm, and a rain jacket works for wet weather. This way, you meet different needs and save weight.
Step 2: Start with the “10 Things to Pack First.”
Focus on essentials first. Focus on core items to create a lean backpack. This way, you won’t miss anything essential. Here are ten things to pack first:
- Water and a lightweight water bottle or canister.
- Nutritious, lightweight food
- First aid kit
- Navigation tools (map, compass, GPS)
- Rain jacket and weather-appropriate clothing layers.
- Fleece or warm layers
- Shelter (tent, tarp, or hammock)
- Sleeping system (sleeping bag and sleeping pad)
- Headlamp or flashlight.
- Multi-tool or knife.
This method helps you keep the essentials. You can also remove optional or duplicate items.
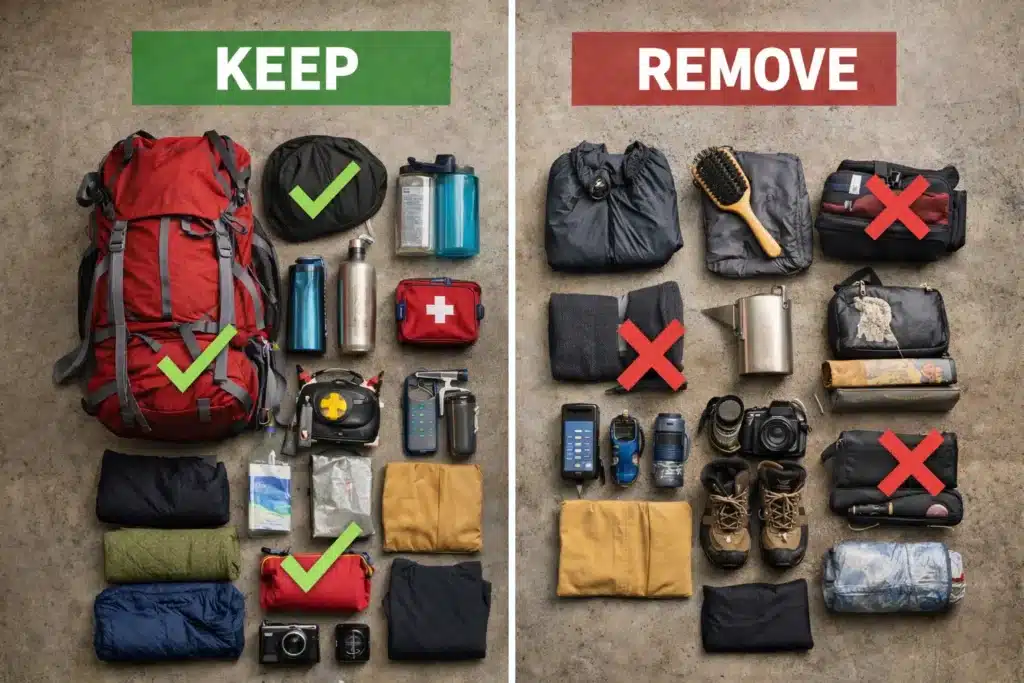
Step 3: Identify Items You Can Leave at Home
Once you pack the essentials, review what’s left. Many backpackers bring optional gear, duplicates, or heavy items that add unnecessary weight. For a short trek, you might not need extra kitchen utensils, backup gadgets, or many pairs of socks.
Example: “Do you really need two pairs of shoes?”
One sturdy pair of shoes is usually enough unless your trek has many terrains or long exposure to mud and water. Leaving the extra pair at home can save weight and reduce pack fatigue.
Other items to consider leaving behind:
| Item Category | Why You Can Leave It |
|---|---|
| Extra clothing | Layer clothing efficiently instead |
| Heavy cooking gear | Use lightweight stoves or canisters |
| Multiple gadgets | Only pack essentials for navigation and safety |
| Bulky toiletries | Minimal travel-sized items suffice |
Step 4: Share or Split Gear if Hiking With Others
If you’re trekking with friends or a group, teamwork can reduce individual load. Split shared items like tents, stoves, or food between group members. One backpacker can carry the sleep system. Another can take the cooking sack and canister. This method lightens your backpack. It also helps everyone carry just what they need for safety and comfort. It’s really useful on backcountry treks. Every pound matters for endurance and energy.
Gear Optimization for a Lighter Pack
Optimizing your gear is a great way to reduce weight. This makes your backpacking trips more comfortable. Small changes to your backpack can cut fatigue, boost your posture, and make long hikes more fun. Choose lightweight gear, smart clothes, and essential digital tools to lighten your load. This way, you stay safe and comfortable.
Upgrade Core Gear
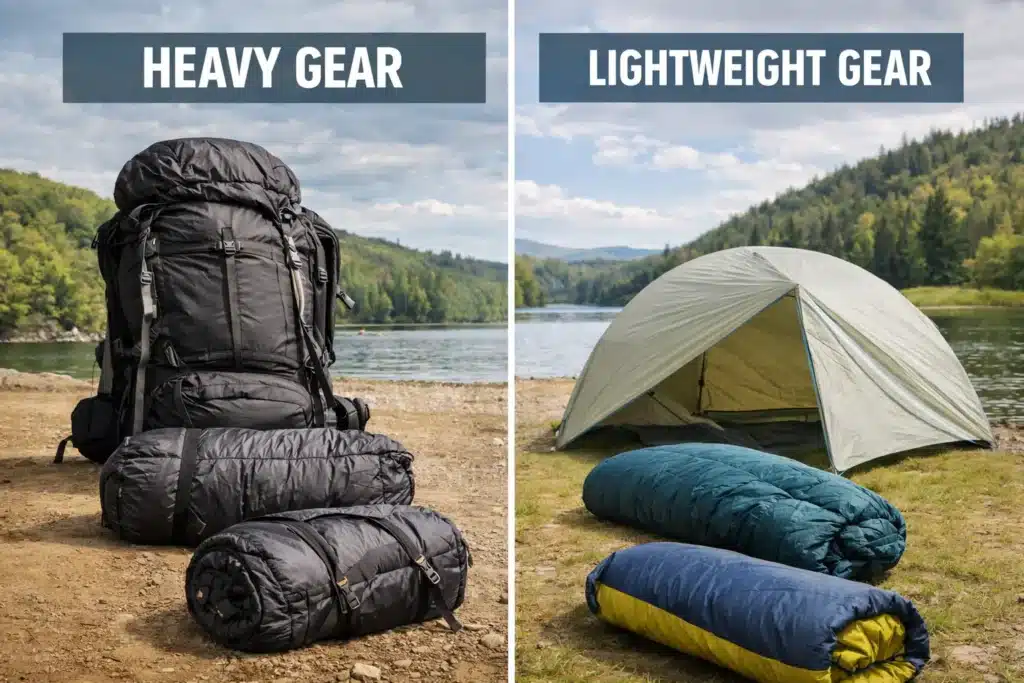
The heaviest items in your backpack are usually the main ones. These include the backpack itself, the tent, the sleeping bag, and the sleeping pad. Upgrading these items with lighter alternatives can make a significant difference.
- Backpack: Choose a lightweight backpack designed for comfort and proper load distribution. Modern ultralight gear backpacks can save 1–2 kg compared to traditional packs.
- Tent: Look for tents with lighter fabrics, compact poles, or single-wall designs. Some models reduce condensation while still protecting you from rain.
- Sleeping Bag and Pad: Choose fluffy, insulated sleeping bags made of compressible materials. Also, pick sleeping pads that are light but offer good support.
Budget-Friendly Options vs Premium Ultralight Gear
| Gear Type | Budget-Friendly Option | Premium Ultralight Gear | Weight Savings |
|---|---|---|---|
| Backpack | Standard hiking pack with frame | Ultralight frameless pack | 1–2 kg |
| Tent | Lightweight 2-person tent | Single-wall, ultralight tent | 1–1.5 kg |
| Sleeping Bag | Synthetic fill bag | Down-fill puffy sleeping bag | 0.5–1 kg |
| Sleeping Pad | Closed-cell foam pad | Inflatable ultralight pad | 0.5–1 kg |
Upgrading core gear is a smart investment. It boosts comfort, cuts down fatigue, and lowers pack weight—without adding bulk. For beginners, starting with affordable gear is smart. Then, you can shift to ultralight options. This way, you save money and reduce weight.
Optimize Clothing and Footwear
Clothing can add a lot of weight to your pack. This is especially true if you overpack or bring heavy items. The key is layering rather than bulk and choosing multipurpose clothing items.
- Layering: Use base layers, mid-layers, and outer layers. This is better than packing bulky items. This strategy lets you stay warm in cold conditions while keeping your pack light.
- Multipurpose Clothing Items: A puffy jacket can serve as both a warm layer and a pillow at night. Convertible pants and shirts work well in various climates. They help cut down on clothing items and lighten your pack.
- Footwear: One pair of sturdy, waterproof shoes is often enough. Leave extra or specialty footwear at home to streamline your pack.
Streamline Your Cooking and Food Gear
Food and cooking gear are common culprits for unnecessarily heavier items. Using lightweight gear and smart planning can significantly cut weight:
- Stoves and Utensils: Small canister stoves, titanium pots, and collapsible utensils reduce load.
- Calorie-dense, dehydrated foods: freeze-dried meals, nuts, and energy bars are compact and light. They provide energy without adding bulk.
- Organization: Use a single sack to store cooking gear and reduce wasted space.
This method helps you pack light. It also makes sure you have all you need for cooking and nutrition.
Lighten Digital & Tech Gear
Digital devices and electronics can add extra weight to your pack if not optimized. Here’s how to carry essentials with maximum efficiency:
- Phones and GPS: Carry one multifunctional device for navigation, communication, and emergencies.
- Cameras and Chargers: Choose compact cameras or share gear with others on group treks.
- Solar Panels or Batteries: Use lightweight, foldable solar panels or high-capacity power banks.
Select and arrange your electronics with careful consideration. This will make your backpack lighter. It ensures you have all the essential tools for safety, navigation, and documentation. Optimize your gear, clothing, cooking setup, and tech. This is the quickest way to save weight and enhance your backpacking experience. Streamline your pack by focusing on essentials. Layer your clothing with careful consideration and choose gear made from lightweight materials. This way, you’ll carry less weight and trek longer without as much fatigue.
Trip-Specific Weight Reduction Strategies
Not all backpacking trips are the same. The length and type of trek determine how much gear you need and how you should pack. Customize your pack for day hikes, weekend trips, or multi-day backpacking. This way, you can lighten your load, boost comfort, and cut down on fatigue. Good planning helps you use space in your pack wisely and keeps the weight balanced.
Day Hikes
For short day hikes, less is more. Your goal is to carry only the essentials to enjoy the trail without unnecessary weight.
- Minimal Essentials: Water, snacks, first aid, navigation tools, and a lightweight jacket or fleece for staying warm.
- Focus on Hydration and Snacks: A compact Therm-a-Rest bottle or small water bottle is enough. Pack high-calorie snacks, like nuts or energy bars. They keep your energy up without being heavy.
Day Hike Packing Example:
| Item | Recommended Weight | Notes |
|---|---|---|
| Water | 0.5–1 L | Use lightweight bottles or canisters |
| Snacks | 200–400 g | High-calorie, lightweight |
| Jacket/Fleece | 200–400 g | Layer for warmth |
| Navigation tools | 100–200 g | Map, compass, or GPS device |
| First aid kit | 100–150 g | Compact emergency kit |
By focusing only on the essentials, you reduce the load and make your day trek enjoyable and safe.
Weekend Trips
Weekend trips require a balance between lightweight gear and comfort. You need a few more items than for a day hike, but you can still pack lighter with proper planning.
- Small Tent or Bivvy Sack: These lightweight shelters, including single-person tents and bivvy sacks, are easy to carry. They offer solid protection. Brands like Osprey offer durable, lightweight options.
- Mix of Lightweight and Comfort Gear: Use ultralight sleeping bags and a compact Therm-a-Rest sleeping pad. Include a rain jacket or puffy jacket for warmth without bulk.
Weekend Trip Tips:
| Gear | Lightweight Option | Purpose |
|---|---|---|
| Shelter | Single-person tent/bivvy sack | Protect from rain and wind |
| Sleeping bag/pad | Down sleeping bag + Therm-a-Rest | Lightest combo for warmth |
| Clothing layers | Fleece + base layer | Layering reduces pack load |
| Food | Dehydrated meals, snacks | Lightweight, calorie-dense |
Weekend trips let you adjust your pack for better weight distribution. This helps you set shoulder straps and hip belts right. It can prevent strain on longer walks.
Multi-Day Backpacking
Longer treks require careful attention to the weight in your pack. With multiple days on the trail, every pound matters.
- Prioritize Ultralight Sleeping System: Use the lightest sleeping bag and Therm-a-Rest pad combination. Compact, high-performance gear is essential. These items add the most to your base weight.
- Divide Food and Water Efficiently: Use smaller containers for water and plan meals in space in your pack efficiently. Consider sharing bulk items with fellow backpackers to lighten the load.
How to Use Resupply Points for Load Reduction?
Resupply points are spots on your route to grab food or other essentials. By planning stops with careful consideration, you can:
- Carry only part of your food at a time.
- Reduce the total pack load each day.
- Save energy and avoid overpacking.
Resupply Planning Table:
| Day | Food Carry | Resupply Points | Notes |
|---|---|---|---|
| 1–2 | 2 days’ worth | Local store or cache | Pack light, restock at checkpoint |
| 3–4 | 2 days’ worth | Next trail town | Replenish calories and water |
| 5 | 1 day’s worth | End of trek | Minimize final-day weight |
By customizing gear and using resupply points, even multi-day backpackers can hike further. This makes their trips more comfortable and lighter. Good planning keeps your pack light and helps you stay less tired on the trek.
Budget-Friendly and DIY Weight Reduction Tips
You can lighten your backpack without breaking the bank on fancy ultralight gear. You can reduce your load by several pounds with smart DIY tweaks and multi-use tools. This way, you won’t lose comfort, safety, or efficiency. Budget-friendly tips help you pack smarter and choose better gear for your trips.
Modify or Replace Heavy Items Without Breaking the Bank
Some gear, such as tents, sleeping pads, and cooking gear, can weigh you down. Try DIY hacks or budget-friendly options instead of the priciest ultralight gear:
- Tents: Swap standard stakes for aluminum ones. Or, use a tarp for a lighter shelter. Tarps are versatile, durable, and much lighter than traditional tents.
- Sleeping Pads: Trim extra foam from old pads. Or, switch to compact Therm-a-Rest options. Even small adjustments can shave off 1–2 pounds.
- Cooking Gear: Replace heavy pots and mugs with lightweight aluminum or titanium alternatives. For example, a single mug can double as a cooking pot for small meals.
You can lighten your bags with small changes. This can cut your pack load by 5–10 pounds, depending on how many items you optimize.
| Gear Item | Standard Weight | DIY/Lightweight Option | Weight Savings |
|---|---|---|---|
| Tent | 4–5 kg | Tarp + light stakes | 2 kg |
| Sleeping pad | 1.5 kg | Cut foam or Therm-a-Rest | 0.5–1 kg |
| Mug / Cookware | 0.5 kg | Titanium mug | 0.2 kg |
For beginners, gear reviews and simple DIY tweaks can help you find effective, lightweight, and budget-friendly items.
Use Multi-Use Gear
Multi-use gear is a smart way to cut weight and reduce clutter. Multi-purpose items save space in your pack and keep it functional. Examples include:
- Clothing Items: A puffy jacket can serve as a sleeping layer at night. Lightweight rain jackets double as windbreakers.
- Cooking Gear: You can use one mug or pot for cooking, drinking, and even storing small items.
- Shelter: Using a tarp instead of a heavy tent can provide shelter, shade, and even ground cover if needed.
Eco-friendly options are often reusable and sustainable. They help you cut your environmental footprint and keep your pack light. Lightweight materials like recycled nylon and strong titanium provide durable and versatile gear options. You can ease your burden by using multi-purpose gear. Also, try budget-friendly DIY tweaks. This way, you won’t sacrifice safety, comfort, or functionality. You can cut pack weight by several pounds with simple changes. Rethink how many items you bring. Also, choose versatile gear. This makes your backpacking trips more enjoyable and efficient.
Packing Techniques That Reduce Weight and Strain
Even the lightest gear can feel heavy when it is packed incorrectly. Packing properly helps you save weight and strain. It protects your shoulders and back, making long hikes more enjoyable. Organizing your gear helps make your hike easier and more comfortable. Lay it out smartly for the best results.
Use smaller backpacks when possible.
Choosing the right backpack size is crucial. A large pack may tempt you to overpack, resulting in a huge weight that strains your body. Opting for a smaller pack encourages you to carry only what is essential.
- Smaller packs help you bring fewer items. You carry only the essentials.
- Use a backpack with several compartments. This helps you organize gear well and makes the most of weight and space.
Tip: If you’re on a short trek or day hike, you don’t need a 70L pack. A 30–40L pack is usually sufficient and can help you carry items with ease while minimizing the weight.
Proper Weight Distribution
How you load your backpack affects both comfort and safety. Improper distribution can lead to fatigue and back pain. It can also make balancing on uneven terrain difficult.
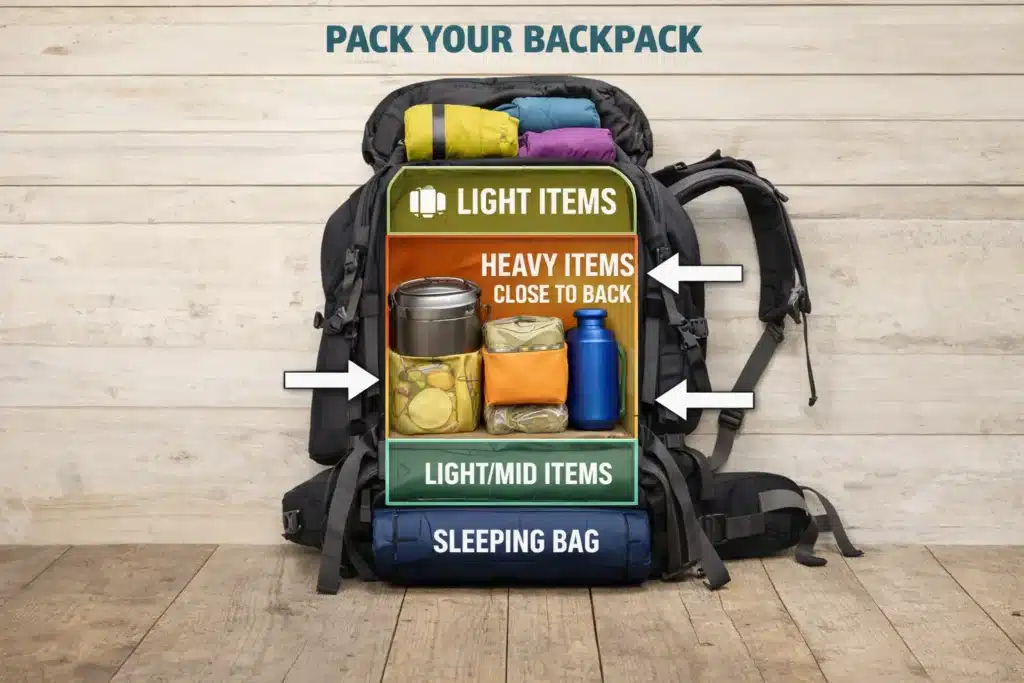
Key packing principles:
- Load heavy items near your back. Put your tent, Therm-a-Rest Z Seat, or food and water by your shoulders and spine. This helps to keep your balance.
- Avoid top-heavy packing. Heavy items on top can pull your pack back. This causes strain on your shoulders and back.
- Place lighter items, like your sleeping bag, clothing layers, and pillow, toward the top or edges of your pack. This helps keep it stable.
| Item Type | Placement in Pack | Reason |
|---|---|---|
| Heavy gear (tent, stove, water) | Close to your back | Maintains the center of gravity |
| Sleeping bag/pad | Bottom or side | Distributes weight without top-heaviness |
| Clothing/layers you need | Top or edges | Easy access and stable load |
| Snacks / small items | Fill gaps in compartments | Reduces wasted space in your pack |
Distributing weight well keeps your pack from straining your back. It also helps you stay balanced on the trail.
Compression and Organization Tips
Using stuff sacks and packing cubes can help organize your gear and prevent wasted space. However, you should use compression wisely. Over-compressing can make your pack feel rigid, affecting comfort and posture.
- Use multiple small sacks: separate clothing, sleeping gear, and food for easier access.
- Avoid over-compressing bulky items. Tightly packing a sleeping bag can cause discomfort. Sometimes, lighter isn’t always better.
- Optimize weight for less: Place items you need frequently at the top or in easy-to-reach compartments.
Example: Instead of using many small bags for food and water, pack meals in one light bag. Rehydrate when needed. This reduces weight for less while keeping your gear organized.
Choose the right pack size. Distribute weight evenly and organize gear in a systematic manner. By doing this, you can carry items with ease and experience reduced fatigue. Proper packing saves energy and protects your shoulders and back. This way, you can enjoy every mile of your trek without a heavy load slowing you down.
Evidence-Based Tips for Long-Term Comfort
Wearing a backpack the right way isn’t about transporting gear. It’s also about keeping your body safe and enjoying your hike. Using evidence-based techniques makes your backpacking trips comfy. It cuts down fatigue and helps prevent long-term injuries. Check your posture, track how your body responds, and learn from seasoned hikers. This way, you can hike longer distances while staying comfortable and efficient.
Monitor Your Posture
A proper backpack setup directly affects spinal health. Carrying a heavy pack the wrong way can cause back pain, shoulder strain, and poor posture over time.
Key Tips:
- Pack smart: Keep the heaviest items close to your back and center of gravity. A backpack with adjustable straps helps balance weight more effectively.
- Maintain Upright Posture: Avoid leaning forward or arching your back. This helps you stay balanced and reduces the ton of weight pulling on your spine.
- Check Shoulder Straps: Make sure shoulder straps and hip belts fit well. This helps take pressure off your shoulders and spreads the weight to your hips. You can carry heavier loads with ease.
Small changes in posture can help avoid injuries. This way, you can enjoy the trail without pain.
Track Your Body’s Response
Listening to your body is essential for comfort and safety on long hikes. Everyone has a different tolerance for weight. Terrain, distance, and fitness level all impact how much pack weight you can carry.
Things to consider:
- Adjust Load Based on Distance: For short day hikes, you may pack without bringing extra gear. For multi-day treks, choose your items wisely. This helps cut pack weight while keeping essentials.
- Listen to Your Body: If you feel soreness, fatigue, or hotspots, it’s time to lighten your pack or rearrange your gear.
- Try Different Gear: Hiking boots, a Therm-a-Rest, or a puffy sleeping bag can lighten your load. This can cut strain and reduce your bags by up to 10 pounds.
Monitoring how your body reacts on hikes helps you balance comfort and weight.
Learn from Experts
Experienced hikers and backpacking pros offer tips to help you dodge common mistakes. They also help you refine your packing list.
Expert Tips:
- Choose Lightweight Gear: Pros opt for lightweight backpacks, tents, and gear. This lets them fulfill their needs without spending a lot on expensive ultralight choices.
- Layering Strategy: Use layers for warmth instead of packing extra clothes. This approach reduces pack weight and frees space in your pack.
- Food and Water Management: Experts carefully plan meals to avoid carrying too much weight in food and water. They rehydrate meals on the trail and carry only what’s necessary.
- Test and Adjust: Many pros use a “trial pack” before long trips. They weigh it to reduce strain and figure out which items are essential for comfort.
Using these expert strategies, you can hike longer distances safely. You’ll keep your body healthy and lighten your backpack to an effective setup.
Summary Table: Evidence-Based Comfort Tips
| Strategy | Key Action | Benefit |
|---|---|---|
| Monitor Posture | Adjust straps, center heavy items | Reduces strain on shoulders and back |
| Track Body Response | Adjust weight by terrain, distance, and fitness | Prevents fatigue and overexertion |
| Learn from Experts | Lightweight gear, essential layers | Optimizes pack weight without sacrificing comfort |
This section keeps you comfortable for the long run. It lowers injury risks and helps you carry what you need without extra weight.
Tools, Checklists, and Resources
Planning your backpacking trip is easier with the right tools, checklists, and trusted resources. Using digital and printable aids helps you remember essentials. They also help manage pack weight. Plus, they make your trips safer and more enjoyable. These resources assist both new and seasoned hikers. They help you pack efficiently and lighten your backpack with minimal effort.
Printable Packing Checklist
A packing checklist is one of the simplest tools to reduce errors and avoid overpacking. A visual guide helps you see what you need. This way, you can plan your items better and avoid extra gear.
Example Printable Checklist Categories:
| Category | Example Items |
|---|---|
| Essentials | Water, snacks, first aid kit, map, compass |
| Clothing | Base layers, fleece, rain jacket, socks |
| Shelter | Tent, tarp, sleeping bag, sleeping pad |
| Cooking Gear | Stove, mug, utensils, dehydrated food |
| Tools & Gadgets | GPS, phone, solar charger, headlamp |
| Miscellaneous | Trash bag, repair kit, toiletries |
A checklist keeps your backpack organized. It helps you pack lighter by taking only what you need.
Backpack Weight Calculator
A backpack weight calculator is a useful online tool. It helps you measure and track your pack weight before and during a hike. It allows you to:
- Calculate the weight for less strain by estimating the total gear weight.
- Determine if your load exceeds the recommended limits for your body size and fitness.
- Adjust your packing list based on distance, duration, or terrain.
Tip: Enter each item with its weight to get an accurate total. This keeps surprises away and ensures your backpack weight is easy to carry on the trail.
Recommended Gear Reviews and Guides
Expert reviews and guides help you choose gear that balances weight, durability, and cost. Reliable reviews cover:
- Backpacks and tents: light, durable, and ergonomically designed.
- Sleeping bags and pads: Therm-a-Rest options or ultralight alternatives.
- Cooking equipment: lightweight stoves, mugs, and utensils.
- Clothing layers: Multipurpose layers for warmth and rain protection.
Tip Table: Choosing Gear Smartly
| Gear Type | What to Look For | Recommended Resource |
|---|---|---|
| Backpack | Lightweight, adjustable straps | Osprey, REI gear reviews |
| Sleeping Bag | Compact, down or synthetic fill | GearLab, OutdoorGearLab |
| Cooking Stove | Efficient, minimal weight | BackpackingLight, SectionHiker |
| Clothing Layers | Multipurpose, moisture-wicking | REI Expert Advice |
Using trusted guides helps you pack efficiently. This way, you avoid extra items and focus on comfort and safety.
Links to Trusted Hiking and Backpacking Resources
Staying informed improves your trips and prevents mistakes. Trusted resources provide expert advice, trail updates, and gear recommendations. Examples include:
- REI Co-op Expert Advice – Packing tips, gear reviews, and safety information.
- Backpacker Magazine – Trail guides, ultralight tips, and expert Q&A.
- SectionHiker – Detailed gear reviews and backpacking strategies.
- GearLab and OutdoorGearLab – Evidence-based testing for ultralight gear.
Using checklists, calculators, and expert resources helps you pack better. This makes your backpack lighter. It also ensures your trips are safer, more efficient, and more enjoyable.
Conclusion
Carrying a heavy backpack doesn’t have to make hiking uncomfortable. To lighten your backpack, check your packing list, pick lightweight gear, and organize your pack well. This way, you stay safe and comfortable. Use proper weight distribution and multi-use items. This helps reduce strain on your back and shoulders. This also makes your bags lighter. Budget-friendly changes and DIY fixes cut pack weight. You don’t need to buy pricey ultralight gear. Always listen to your body and adjust the load based on distance, terrain, and fitness. Using these strategies, you can carry what you need. Move efficiently and enjoy every trek. Don’t let the heavyweight slow you down.
Frequently Asked Questions
1. How can I reduce my backpacking pack weight easily?
You can reduce backpack weight by choosing light gear, planning meals, carrying only water until refill points, and cutting unnecessary items from your packing list.
2. What gear categories add the most weight to my pack?
Your tent, sleeping system (sleeping bag and pad), and backpack are the heaviest. Replacing these with lighter alternatives can significantly reduce weight.
3. Should I bring extra clothes for backpacking?
Only bring the essential clothing layers you need for warmth. Avoid extra outfits you won’t wear, as clothing can add bulk and weight without much benefit.
4. How can I manage water weight on the trail?
Plan water stops along your route and carry only enough water to reach the next source. Use a lightweight filter or purification method to ensure a safe refill.
5. Do multi-purpose gear items help to lighten a backpack?
Yes. Multi‑use gear saves space and weight. For example, a pot that doubles as a bowl or a bandana that serves several uses reduces total gear load.